Tuesday, April 14, 2026

Blueberry Lemon Cheesecake Bars

It's time for me to start adding more recipes that I make to my blog since I use it as my cookbook. I made this one for my family Easter dinner. I was looking for an Easter cheesecake bars recipe, and I found this at The Girl Who Ate Everything. It takes quite a few lemons to get the zest and juice, so stock up. It turned out pretty and delicious, sweet with a bit of sour. Doesn't it look perfect for Easter? 


Lemon Blueberry Cheesecake Bars

Crust
1 1/4 c. unsalted butter, room temperature
1/2 c. granulated sugar
1 heaping T. lemon zest
2 c. flour
1/4 t. salt
Blueberry Topping
2 c. fresh blueberries
2 T. brown sugar
2 T. lemon zest
2 T. lemon juice
Cream Cheese Layer
2 (8-oz) pkg. cream cheese, room temperature
1/2 c. granulated sugar
2 t. lemon zest
1 T. vanilla
2 eggs

Preheat oven to 350° and line a 9 x 13 pan with parchment paper.

Crust: Beat the butter, sugar, and lemon zest until creamy. Add the flour and salt and beat until combined. Press dough into bottom of prepared pan and bake for 15 minutes.

Topping: Combine blueberries, brown sugar, 2 tablespoons lemon zest, and lemon juice in a small saucepan. Cook over medium heat, stirring occasionally, until berries are just soft, 5 - 10 minutes. Set aside to cool.

Cream cheese layer: Beat cream cheese, sugar, lemon zest, and vanilla together. Beat in the eggs, one at a time, until combined. Spread cream cheese mixture onto warm crust and smooth top. Dollop blueberry topping randomly over top of cream cheese layer. Gently pull a knife tip through the top to create swirls.

Bake on the middle rack of the oven for 30-40 minutes until topping is set. Refrigerate for at least 2 hours or until well chilled.

Sunday, October 20, 2024

Cheese Fatayer

Several months ago I was on the hunt for Aleppo pepper and nigella seeds so that I could make these fatayers that I found at Hajar's blog Moribyan. They didn't have either in several stores that I went. After finding Aleppo pepper in a grocery store not too far away, I was finally able to find the nigella seeds at a Middle Eastern market. Nigella seeds look like black sesame seeds. Aleppo pepper looks similar to crushed red pepper, but it's not spicy. 


The instructions are to make 12 delicious fatayers, but you can make them bigger or smaller if you'd like. 


Cheese Fatayer

Dough

2 2/3 c. all-purpose flour, additional as needed
1/2 T. salt
1/2 T. instant yeast
1 c. lukewarm water
1/2 T. sugar
2 T. olive oil
2 T. plain yogurt
Milk or heavy cream (or beaten egg white), for brushing

Cheese Filling

3 c. shredded mozzarella cheese
1 c. crumbled feta cheese
1 T. parsley, finely chopped
1 large egg, beaten
1/2 t. onion powder
1 t. dried mint
1 t. Aleppo pepper
1/2 t. black pepper
1/2 t. garlic powder
1 t. nigella seeds

Add the flour, salt, yeast, water, sugar, olive oil, and plain yogurt to a large mixing bowl. Mix using a hook attachment on a stand mixer or knead it by hand. Knead together for 2 to 3 minutes until the dough is soft and elastic. It should be a bit sticky but not difficult to handle. If it is too sticky, add a tablespoon of flour at a time until not sticky.

Transfer the dough to a greased bowl. Cover it and let it rest in a warm place for an hour or until double in size.

While the dough rests, prepare the cheese filling. Combine mozzarella cheese, feta cheese, parsley, egg, onion powder, mint, Aleppo pepper, black pepper, garlic powder, and nigella seeds in a bowl. Set aside until assembly.

After an hour, preheat oven to 475°. Punch down the dough and divide it into 12 equal portions, pinching each piece into a tight ball. Stretch each piece out longways and then shape it into an oval/football shape.

Add a generous amount of cheese filling to the center and fold over the left and right sides while pinching the top and bottom to create a shape that looks like a boat.

Transfer to a baking sheet lined with parchment paper. Brush the edges with milk, heavy cream, or egg white. Repeat with the rest.

Bake in the oven for 10 to 12 minutes until golden brown on the edges. 


Sunday, April 7, 2024

Lemon Poppy Seed Raspberry Layer Cake

I made a cake that felt like spring to me for Easter Sunday dessert. Lemon and raspberries are a delicious combination. I found this recipe at Cake by Courtney and added the lemon curd to the layers. Sweet with a bit of sour, and soft with a bit of crunch! 

Lemon Poppy Seed Raspberry Layer Cake

3 c. cake flour
2 t. baking powder
1 t. salt
Zest of one lemon
3 T. poppy seeds (soaked in water for about an hour and then drained before adding)
1 c. unsalted butter, at room temperature
1 3/4 c. granulated sugar
6 lg. egg whites, at room temperature
1 c. lemon juice
½ c. sour cream, at room temperature

Buttercream Frosting:
6 c. powdered sugar, measured and then sifted
6 oz. cream cheese, slightly cold
1 1/2 c. unsalted butter, slightly cold
1 t. pure vanilla extract
1 t. lemon extract

Filling:
Fresh raspberries, one small carton
1/3 c. lemon curd

Preheat oven to 325°. Spray three 8-inch or four 6-inch round cake pans with nonstick spray, line the bottom with parchment paper, and spray again. Spray wire cooling racks. Set aside.

In a medium-sized mixing bowl, whisk together the cake flour, baking powder, lemon zest, salt, and drained poppy seeds. Set aside.

In the bowl of an electric mixer, fitted with the paddle attachment, cream the butter and the sugar for two minutes on medium-high speed. The color will become lighter and the texture should be smooth.

Scrape down the sides of the bowl and add the egg whites on medium speed, scraping down the sides and bottom of the bowl between addition. Continue to beat the mixture on medium-high speed for an additional 2 to 3 minutes. When ready, the batter should appear lighter in color and have increased in volume.

With the mixer on low speed, add ⅓ of the flour mixture, followed by ½ cup of the lemon juice. Repeat the additions, ⅓ flour mixture, ½ cup juice and the final ⅓ flour mixture. Mix until the flour mixture is just incorporated, about 30 seconds. Scrape down the sides and bottom of the bowl and mix again for another 20 to 30 seconds on low. Gently fold in the sour cream.

Evenly divide the batter between each pan (about 16 ounces of cake batter into each of the three 8-inch cake pans or 12 ounces in each of the 6-inch pans) and bake for 25-30 minutes or until a toothpick inserted into the center of the cake comes out with a few moist crumbs on it. Let cool in the pans for about 15 minutes and then invert onto the prepared wire cooling racks to cool completely.

While the cake is cooking, prepare the frosting. In a large bowl of a stand mixer fitted with the paddle attachment, beat the cream cheese and butter on medium speed until light and fluffy.

Gradually add in the sifted powdered sugar, 1 cup at a time, beating well after each addition and scraping down the sides of the bowl. Continue to beat until very fluffy, about 3-4 minutes.

Add the vanilla and lemon extract and beat well. This makes enough for the filling between layers and to frost the top and sides. (You can make additional frosting to pipe if desired.)

When cake layers have cooled and frosting is prepared, place one cake layer, bottom side down, on a cake plate or cake board. Gently spread about 1 cup of frosting across the top of the cake layer. Make sure to get eye level with the cake to ensure the frosting is even. Spread half of the lemon curd evenly over the frosting. Cover with fresh raspberries.

Place the next cake layer on top of the raspberries. Gently spread about 1 cup of the frosting over it. Spread remaining lemon curd evenly over the frosting. Cover with fresh raspberries.

Place the final cake layer, top side down, on top. Give the cake a quick crumb coat (a thin layer of frosting) and chill for 10 to 15 minutes in the freezer before frosting the entire cake. Decorate top with additional raspberries or as desired.

Store in the refrigerator until almost ready to serve. 

Tuesday, March 26, 2024

Peach Cobbler Pound Cake

I recently made this cake for my son's birthday dessert. I used a smaller loaf pan than the recipe called for, so I put the rest of the batter in 2 ramekins. That made my loaf smaller, but it was very moist with delicious peaches. I found this recipe at Owl B Baking where Liz has pretty pictures of the bread that made me want to try this!


Peach Cobbler Pound Cake

Streusel:
3 T. butter, room temperature
1/2 c. light brown sugar
1/2 c. flour
1 t. cinnamon
1/8 t. nutmeg
1/8 t. salt

Cake:
2 (15-oz.) cans of sliced peaches or peach halves OR 5-6 fresh whole peaches, peeled
16 T. unsalted butter, room temperature
1 c. granulated sugar
4 eggs
2 c. flour
1 1/2 t. baking powder
1/2 t. salt
1/2 c. milk, room temperature
1 1/2 t. vanilla extract
1/4 t. almond extract

Glaze:
2 c. powdered sugar
2-4 T. milk

Preheat your oven to 350°. Lightly grease a 9" x 5" loaf pan.

Start with making the streusel. In a large bowl, combine the softened butter and sugar using a mixer. Mix until fully incorporated. Add the flour, cinnamon, nutmeg & salt. Mix on low speed to combine.

The mixture will be crumbly. Use your hands to incorporate flour completely. Place the streusel into the freezer to chill.

Dice the peaches into small pieces and dry off gently with a dry paper towel. You should have about 1 1/2- 2 cups of diced peaches. Set aside.

For the cake, in a large bowl, beat the softened butter using a mixer until very light and airy. Add the sugar and mix until it's completely incorporated and fluffy. Add the eggs, one at a time into the butter mixture, stirring thoroughly until the mixture is light and fluffy.

In a separate large mixing bowl, whisk together the flour, baking powder, and salt. Scoop out 1 tablespoon of the dry ingredients and set aside.

In another small bowl or glass measuring cup, whisk together the milk and extract. Add about 1/3 of the dry ingredients into the creamed mixture; stir until just combined. Then add 1/3 of the milk, stir, and repeat alternating the dry ingredients and milk, stirring well in between each, starting and ending with the flour.

Sprinkle the 1 tablespoon of reserved flour mixture on top of the peaches and coat. Fold the peaches into batter.

Gently scoop the cake batter into the prepared pan; smooth the top with a spatula. Remove the streusel from the freezer and sprinkle evenly on top, leaving large and small clumps.

Bake for 60 to 65 minutes, until the cake springs back when lightly pressed in the center and a long toothpick or cake tester inserted into the center comes out clean. If the cake is browning too quickly, cover it with aluminum foil for the final 15 minutes of baking. Remove the cake from the oven and loosen its edges after 5 minutes. After that, carefully turn it out of the pan onto a rack to cool.

Once the cake is fully cooled, make the glaze by mixing together the glaze ingredients until smooth, and drizzle over the top of the cake using a fork. Allow the glaze to set before slicing.


Sunday, February 4, 2024

Moelleux au chocolat (Molten Chocolate Cake)

I've been in the mood for something baked and chocolate, so I decided to give this recipe from Laylita's Recipes a try. If you've never tried any of her recipes, take a look around her blog. Everything I've tried from it has been excellent. I baked this for 15 minutes, the longest time recommended on the recipe at 410°, but I think it could have baked for just a minute or two more. I was afraid to cook it too long and dry it out. It was still really good - chocolatey, molten, and it hit the spot for me! 


Moelleux au chocolat (Molten Chocolate Cake)

7 oz. (200 g) baking dark chocolate
3.5 oz.(100 g) salted butter
3.5 oz.(100 g) sugar 
2 T. flour
3 eggs

Melt the chocolate and the butter on medium heat in a thick-bottom saucepan or in a bain-marie. Mix constantly to avoid the ingredients from sticking and burning. Remove from heat as soon as the chocolate is completely melted, and place it in a bowl at room temperature. 

Preheat the oven at 410°.

Add the eggs to the melted chocolate and butter, mixing well with a whisk. Then use a spoon to add mix in the sugar, mixing well. Add the flour, and stir just until mixed in and smooth.

Lightly grease a rectangular bread pan by coating it with butter on all inner sides. Or you can bake it in 4 ramekins. Pour the mix in the baking pan and bake for 15- 20 minutes at 400° (or 13-15 minutes at 410°). The cake will be done when the edges start to get golden and separate from the baking mold. The center should still be soft. If baking in individual ramekins, bake for 10-12 minutes at 400°.

Let the cake cool down for 5 minutes for the rectangular mold or 3 minutes for the ramekins, then gently remove it from the mold. Serve the cake immediately.

Can be stored in the refrigerator and warmed for 20-30 seconds. 

Sunday, January 21, 2024

Tandoori Chicken Naan Pizza

I love food with flavor, herbs, and spices, and this one is FULL on flavor with a perfect spicy kick. It is so good! I made my own naan bread (as you can tell by the irregular shapes), but you can use purchased naan if you like. I forgot to buy mozzarella, so I made it with gruyere that I had. 

I found this recipe on Host the Toast, and knew that I had to make this right away. So glad I did! The ingredients list is a little long, but this is easy to make, and very worth it. 


Tandoori Chicken Naan Pizza

3 pieces naan bread
1/2 c. plain yogurt, plus more to top
Lemon zest for yogurt topping
Juice of 1 lemon
2 T. vegetable oil, plus more for brushing
4 cloves garlic, chopped
2 T. ginger
1 t. hot paprika
2 t. ground cumin
2 t. garam masala
1/2 t. cayenne pepper
2 lb. boneless skinless chicken thighs
2 T. tomato paste
1/2 red onion, sliced
1 cup mango, sliced
1 c. mozzarella, shredded
Mint, to garnish
Cilantro, to garnish
Plain yogurt

Combine the yogurt, lemon juice, oil, garlic, ginger, paprika, cumin, garam masala, and cayenne pepper in a food processor. Process until smooth.

Sprinkle the chicken thighs with salt and place in a freezer bag with half of the marinade, turning to coat well. Reserve the remaining half of the marinade in a separate container. Refrigerate all for 2 hours or overnight.

Preheat the grill to medium-high. Grill the chicken 5 minutes per side, or until it reaches 160° F. Remove from heat and chop chicken.

Brush the naan with oil. Mix the previously reserved marinade mixture with 2 tablespoons of tomato paste. Add additional yogurt to thin, if necessary, to give a spreadable consistency.

Spread the naan with the tomato-yogurt mixture. Top with red onion, chicken, mango, and mozzarella. Turn down the heat on the grill and place the naan pizzas on the grate, or put the naan pizzas on a shelf above the grill grate. Close the lid and grill until the cheese melts. Remove from heat.

Alternatively, preheat the oven to 400° F and cook pizzas on a cookie sheet or pizza stone.   

Mix the extra yogurt with lemon zest. Top the pizzas with mint leaves and cilantro, drizzle with yogurt, and serve.


Saturday, January 6, 2024

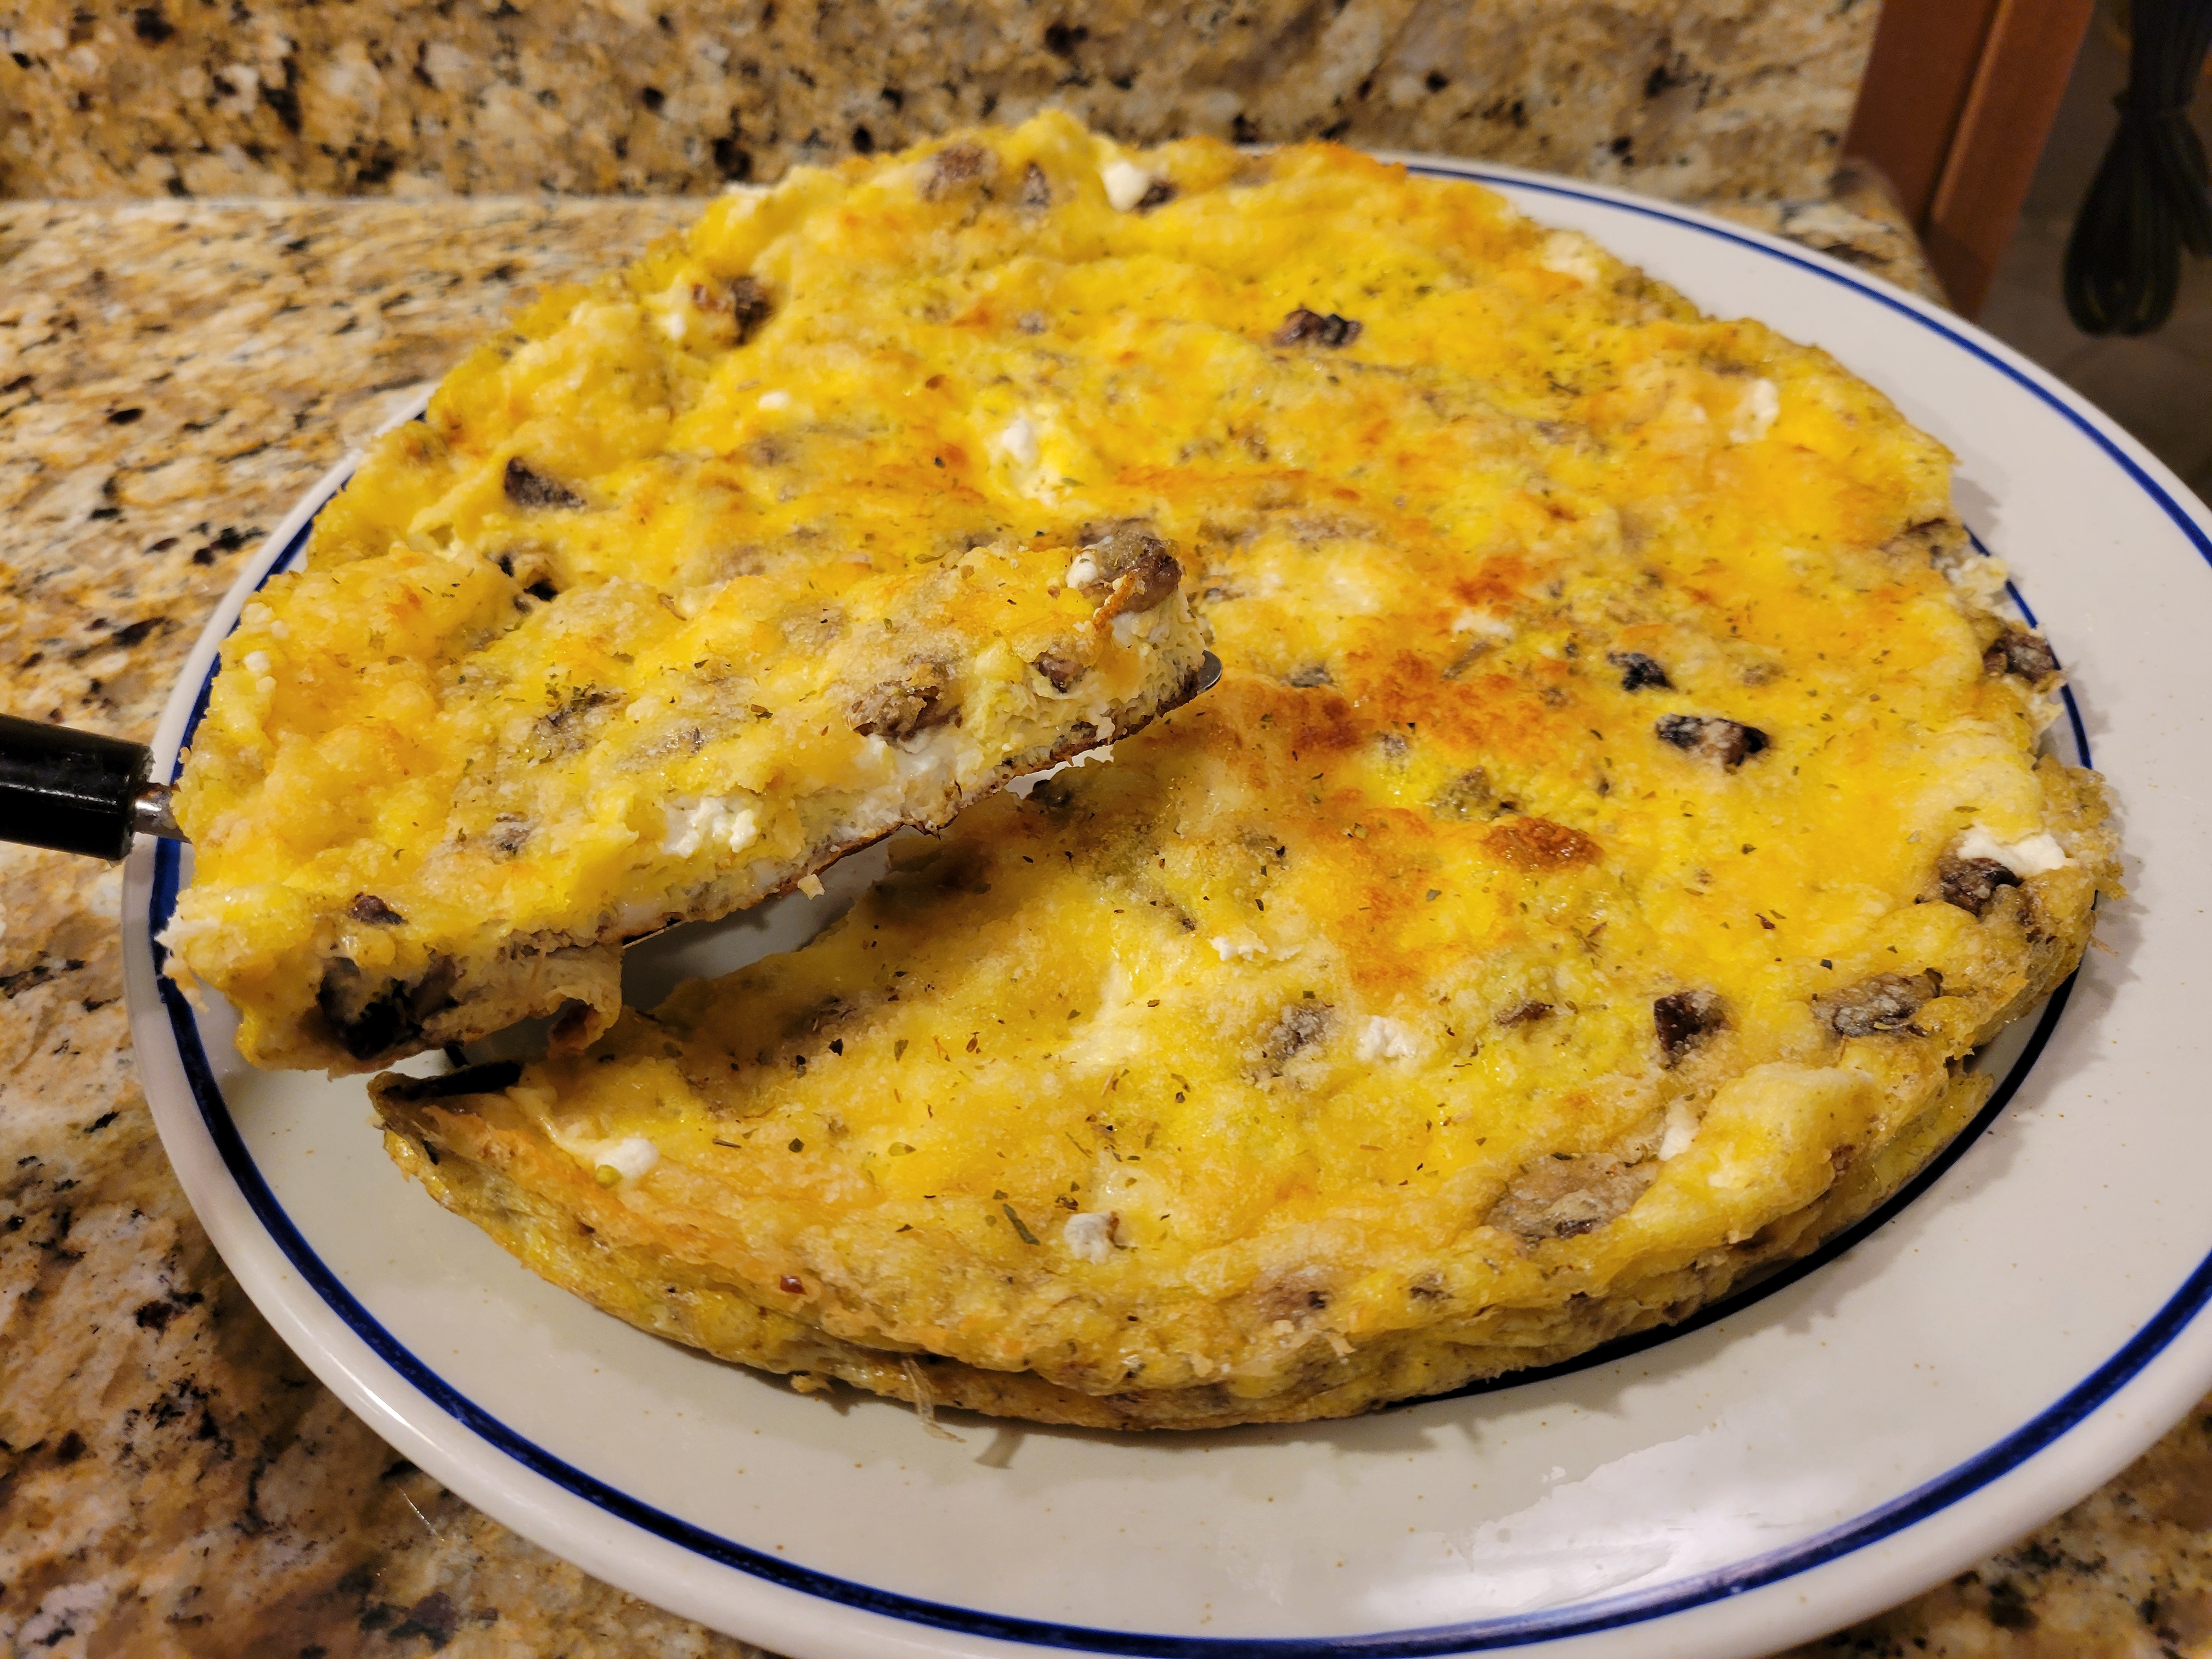
Mushroom, Goat Cheese, and Herb Frittata

I made this frittata from Williams Sonoma for the first time for part of our Christmas breakfast. We liked it with the addition of creamy goat cheese and the herbs in the eggs. Next time, I'll chop the mushrooms bigger though. It was a delicious with our raspberry French toast bake. Sweet & savory Christmas breakfast. 


Mushroom, Goat Cheese, and Herb Frittata


4 T. extra-virgin olive oil

2 shallots, finely chopped

1 c. chopped mixed mushrooms

1 t. minced fresh thyme or 1/2 t. .thyme

1 t. minced fresh oregano or 1/2 t. dried oregano

1/4 t. crushed red pepper flakes

Salt, to taste

Ground pepper, to taste

10 large eggs

3 T. heavy cream

125 g. fresh goat cheese, crumbled

1/3 c. (45 g.) freshly grated Parmesan cheese


Preheat the broiler.

In a large oven-safe frying pan over medium-high heat, warm 1 tablespoon olive oil. Add the shallots, mushrooms, thyme, oregano, and crushed red pepper flakes. Season with salt and pepper to taste, and sauté, stirring often, until the shallots are soft and the mushrooms have released most of their liquid, about 5 to 7 minutes. Remove from the heat.

In a bowl, beat together the eggs, cream, 1/2 teaspoon salt and 4 or 5 grinds of pepper with a whisk until blended. Add the shallot-mushroom mixture and the goat cheese and set aside.


Rinse out the fry pan. Place it over medium-high heat, and warm the remaining 3 tablespoon olive oil. Pour in the egg mixture, spreading the vegetables in an even layer. As the eggs set around the edges of the pan, lift the edges of the frittata with a spatula and tilt the pan to allow the liquid egg in the center to run underneath. Cook until the eggs are firmly set along the edges but the center is still runny, about 10 to 15 minutes.


Sprinkle the Parmesan over the frittata and place under the broiler until the top is set and golden, about 2 minutes. Remove the pan from the broiler. Loosen the edges of the frittata and slide it onto a serving plate. Let cool for 15 minutes. Cut into wedges and serve warm or at room temperature. 

Sunday, November 26, 2023

Baked Potato Wedges

For at least a month, I was asking my children what they'd like me to make to take to Thanksgiving dinner at their grandma's house. I only got two requests, so we planned on those. On Monday the week of Thanksgiving, I went grocery shopping. On Tuesday night, one of my daughter's requested potato wedges and sent me this recipe from Dinner at the Zoo

I didn't want to go back to the store that close to Thanksgiving, so she's lucky I had most of the ingredients. I didn't have fresh parsley, so I used dried. I had parmigiano reggiano instead of parmesan, so that's what I used. I had run out of paprika, so I used Cajun seasoning. 

I baked them in spread out in one layer on a baking sheet and then put them on a serving platter (below). They turned out crispy on the outside and soft in the inside with a great flavor. I'm always happy to have another good potato recipe!  


Baked Potato Wedges

4 medium Russet potatoes, scrubbed and cut into eighths
1/4 c. olive oil
1 t. onion powder
1 t. garlic powder
1 t. smoked paprika OR Cajun seasoning
2 t. salt
1/2 t. pepper
1/3 c. finely grated parmesan cheese
2 T. chopped fresh parsley
Nonstick cooking spray

Preheat the oven to 400°. Line a sheet pan with foil and coat the foil with nonstick cooking spray.

Mix olive oil, onion powder, garlic powder, smoked paprika, salt, pepper and parmesan cheese in a bowl. Place the potato wedges in the bowl. With hands, toss wedges in topping to coat the potatoes evenly with the seasoning.

Spread the potatoes in a single layer on the prepared baking sheet. Bake for 35 minutes or until golden brown and fork tender. Sprinkle with parsley and serve.

Sunday, March 5, 2023

Mock Chocolate Eclairs

This is a delicious, easy no-bake recipe. I've been making it for many years, and it's a family favorite at our house. I can't believe it has taken me this long to add the recipe to my blog.

Although the recipe calls for a 16-ounce package of graham crackers, you won't use all of them. Make sure to get the instant pudding, NOT the cook and serve. This dessert is easy to make, but hard to wait until the next day when you can eat it. Have patience and wait or the graham crackers won't be soft. 

You can choose to do just 2 layers of pudding mixture with 3 layers of graham crackers OR 3 layers pudding with 4 layers of graham crackers like in the instructions. Whatever your preference.

Mock Chocolate Eclairs

2 (3.4-oz.) pkg. instant vanilla pudding mix
1 c. powdered sugar
3 c. milk
1 (8-oz.) container frozen whipped topping, thawed
1 (16-oz.) pkg. graham crackers

Chocolate Topping
1/4 c. cocoa
2/3 c. sugar
1/4 c. skim milk
1 T. vanilla extract
1 T. butter

In a large bowl, combine pudding mix and powdered sugar. Whisk in milk until mixture is smooth, then gradually fold in whipped topping. Place a layer of graham crackers in the bottom of a 9x13-inch pan. Spread one-third of the pudding mixture over the crackers. Cover pudding with another layer of graham crackers. Continue layering and end with graham crackers. 

Chocolate topping:
Combine cocoa, sugar, and milk in saucepan. Bring to a boil for 2 minute, stirring constantly. Remove from heat and and vanilla and butter. Cool slightly and pour over the layer of graham crackers. Refrigerate overnight before serving.   


Saturday, January 14, 2023

Curry Udon

When my children and I were planning a trip to Oahu a couple of years ago, my son said the one restaurant he wanted to go to was Marugame Udon. It's a chain in Japan (although it's called Marugame Seimen in Japan) that he really liked. 

The first time we passed the restaurant in Hawaii, the line was out the door, down the street, and around the corner. For real. It's so popular. When we decided to go there for dinner, the line was almost as long, so we waited in the heat and blaring sun to get our udon. 

I had the curry udon with beef curry broth, and it was worth the wait in the sun. So good! When I got back from vacation, I kept thinking about how good it was, so I searched for a curry udon recipe that was similar. I found this one at Cilantro and Citronella, and even though it wasn't the same, it looked and sounded good. And it is! 

And I don't have to wait and sweat in a long line outside to get it.

This dish is full of flavor and is easy to make. I find refrigerated udon noodles in the produce section of the grocery store near won ton wrappers.   


Curry Udon
14 oz.(400 g.) fresh udon noodles
4 T. canola oil, divided
½ med. onion, thinly sliced
1 small potato, cubed
1 carrot, sliced
2 – 3 dried shiitake mushrooms
3 c. vegetable stock 
4 T. flour
1 T. curry powder
1 T. garam masala
½ t. cayenne pepper (optional)
1 T. soy sauce, plus more to taste
Pepper, to taste
1 green onion, sliced

Cook the udon noodles according to the package directions. Drain and set aside.

Heat 1 tablespoon oil in a large pot over medium heat. Add the onion and fry until soft and transparent. Add the potato, carrot, shiitake mushrooms, and vegetable stock. Bring to a boil, then reduce heat to a simmer and cook until the vegetables are tender.

Meanwhile prepare the curry roux. Heat the remaining 3 tablespoons oil in a pan over medium-low heat. Add the flour, curry powder and garam masala and mix well. Stir for about 5 minutes, then add 1 tablespoon of soy sauce. Continue to cook and stir until the roux sticks together in a ball and starts to crumble apart. Remove from the heat.

When vegetables are ready, ladle some of the soup into the pan with the roux and stir well to dissolve the flour. Pour this into the pot with the soup and mix well as it thickens. Adjust seasoning to taste. Remove shiitake mushrooms, slice them, and add them back in. Add a little more stock or water for thinner soup.

Divide the noodles into your bowls. Ladle curry stew on noodles, and garnish with chopped green onions.

Sunday, March 6, 2022

Hype 👏🏽 It 👏🏽 Up!

A few weeks ago, I had planned ahead of time to go on a girls night out with my friend Cindy. I had been looking forward to it the whole week. That Friday morning, I started counting down the hours of work left before my weekend started and I we could have fun, and I did a little happy dance before I started working. The day was still packed with one thing after another at work, but I felt less stressed about it than I usually do.


A few days later, I was listening to a LinkedIn Learning audio course that mentioned that anticipating a good event releases dopamine (one of the happy chemicals our bodies can make) just like experiencing the good event does. (I can't remember which course it was so I could cite it.) That made me remember how happy I was anticipating catching up with my friend, having yummy food, and listening to good music. 


I have been worried for quite some time about my chronic stress and the health effects of all the cortisol constantly pumping through my body. I've tried to find ways to reduce stress, but most things I've tried don't seem to help me. After hearing how looking forward to something fun releases dopamine, I decided that I need to spend more time thinking about even the little things I have planned.


Since then, I’ve been getting happier about a warm day coming up, getting to go on a lunch walk, going out to a new restaurant with all three of my children, and a lecture I was attending. I’m spending a little bit of time envisioning me in that situation and what I like about it. I’ve felt like it has helped me be happier overall and even to enjoy the events more than I might have if I hadn’t deliberately been thinking about good things to look forward to. It hasn’t taken away my stressful situations, and it wasn’t something huge and magical, but I’ll take it.


From now on, I’m gonna choose to exaggerate the good and


Hype

   It

     Up!


Here are two of the articles related to this that I’ve read in case you’d like to read them:


Dopamine: More Than Pleasure, The Secret is the Anticipation of a Reward  (This one also talks about how music can help our brain produce more dopamine, which is interesting to read about too.)


Your Brain Needs a Party


Sunday, February 27, 2022

Peanut Butter Pie

I don't make this pie very often since I have a daughter with a peanut allergy, but I started making it a long time ago. Quick to make and the classic peanut butter and chocolate combination. I like to top it with Oreo pieces or chocolate chips to add some texture to the smooth pie, but you can choose your favorite garnishes. 

Peanut Butter Pie

8 oz. cream cheese, room temperature
1 c. creamy peanut butter
1 c. powdered sugar 
1 (16-oz) tub whipped topping
1 9" prepared chocolate cookie crust (store-bought or use recipe below)

In large bowl, mix cream cheese and peanut butter until completely combined. Add powdered sugar and mix until smooth.

Fold in the whipped topping.

Pour mixture into crust. Chill for at least 2 hours before serving.

Garnish as desired (whipped topping, Oreo crumbles, chocolate chips, chopped Reese’s Cups). 

Chocolate Cookie Crust:
24 Oreos
4 T. butter, melted

Place Oreos in food processor or blend. Grind until fine crumbs. Pour into bowl.

Pour melted butter on Oreo crumbs and mix well. Pour into pie pan. Press flat on bottom and up sides of pan. Refrigerate for 30 minutes before filling.   


Sunday, January 23, 2022

Lemon Blueberry Dutch Baby

This recipe, that I found at The Foodie Physician, is so quick to make, looks beautiful, and tastes amazing.  I served it with lemon drizzle and maple syrup. Next time I'll have lemon curd too. 


Lemon Blueberry Dutch Baby

2 T. unsalted butter, divided
1 ½ c. fresh or frozen blueberries
3 large eggs
¾ c. milk
¾ c. flour 
½ t. vanilla extract
Zest of 1 lemon
2 T. fresh lemon juice
2 T. light brown sugar
¼ t. salt

Preheat oven to 400°.

Place 1 tablespoon of butter in a 10-inch cast iron skillet (or other oven-safe skillet). Place the skillet in the oven for a few minutes just until the butter is melted. Remove from oven and spread blueberries evenly in the skillet.

Melt the remaining tablespoon of butter and pour into blender. Add eggs, milk, flour, vanilla, lemon zest, lemon juice, sugar, and salt. Blend until smooth. 

Slowly pour batter over the blueberries in the skillet, and put skillet in the oven. Bake 20-25 minutes until puffed up and golden brown. Remove from oven and serve warm with desired toppings (Lemon curd, maple syrup, powdered sugar, or lemon drizzle (recipe below). It is normal for it to fall shortly after being removed from the oven. 

Lemon drizzle:
¾ c. powdered sugar
¼ t. vanilla extract
Fresh lemon juice 

Mix powdered sugar and vanilla extract. Add enough lemon juice to make desired consistency. Mix until smooth. 


Sunday, August 15, 2021

Mini Chocolate Cherry Tarts

I've been making these cute tarts for years. I have a mini heart tart pan that I often use for these (in the photo at the bottom of the post), but I also like them in my regular mini muffin pan. The mini muffins are a little bigger and hold more cream cheese filling.  


Mini Chocolate Cherry Tarts 

Pastry Crust: 
1 1/2 c. flour 
1/3 c. sugar 
1/4 c. unsweetened cocoa 
1/2 c. butter or margarine 
3-5 T. water 

Cream Cheese Mixture: 
4 oz. cream cheese 
1/4 c. sugar 
1 egg 
1/2 t. vanilla or almond extract 

Preheat oven to 350°F. In a small bowl, combine flour, sugar and cocoa. Cut in butter until pieces are the size of small peas. Sprinkle with water, tossing until moistened and dough sticks together. Form into 1 inch diameter log. Divide pastry into around 28 balls. Place in ungreased mini-muffin pan; press dough evenly, using tart tamper, to make a shell.

In new bowl, beat cream cheese until light and creamy, gradually add sugar, mix well. Add egg and vanilla and mix well. Top unbaked tarts with cream cheese mixture. Bake for 15-20 minutes or until done. Remove from pans; cool completely. Top each with teaspoon of cherry pie filling.


Sunday, July 25, 2021

Breakfast Pizza

I made this rustic, from-scratch, breakfast pizza for brunch yesterday. I found the recipe at SkinnyTaste. Next time I make it, I'll add more spinach and tomatoes and no bacon, just for my taste. But it was good this way too. The recipe makes 4 pizzas, but I only put two on the serving platter along with the waffles and fruit. 


Breakfast Pizza 

1 c. (5 oz) flour

1 1/2 t. baking powder

1/2 t. kosher salt

1 c. non-fat Greek yogurt (not regular), drained of any liquid

Handful baby spinach

2 oz. (1/2 c.) shredded mozzarella cheese

8 cherry tomatoessliced

4 large eggs

2 strips cooked baconchopped


Preheat the oven to 450°. Place a silicone liner on a large baking sheet or spray with oil if using parchment.


In a medium bowl combine the flour, baking powder and salt and whisk well.

Add the yogurt and mix with a fork or spatula until well combined. It will look like small crumbles.


Lightly dust flour on a work surface and remove dough from the bowl, knead the dough a few times until dough is tacky, but not sticky, about 20 turns. It should not leave dough on your hand when you pull away. Divide into 4 equal balls about 3-3/8 oz each.


Sprinkle a work surface and rolling pin with a little flour roll the dough out into thin ovals 7 to 8 inches in diameter and place on the prepared baking sheet.


Top with spinach, mozzarella, and tomatoes, leaving the center open for the egg. Gently break an egg the center of each dough and top with bacon. Bake 10 to 12 minutes, until the crust is golden and the egg is set. Season with salt and pepper.


Sunday, July 18, 2021

Ube Crinkle Cookies

I recently got back from a vacation in Hawaii. One of the cool things about being there besides all the beautiful nature is that it's almost like being in a different country compared to the mainland. We went to some stores we haven't been to since we were in Japan and ate at a couple of Japanese restaurants. One of the foods that they had in Hawaii that they also have in Japan but is actually from the Philippines is ube desserts. 

If you've never heard of ube, it's a purple yam. Cool, right? If you want to give ube a try and you happen to live in Utah, here are a few places you can go.

Momi Donuts at the Gateway - ube mochi donuts and ube mochi bars

Doki Doki 249 E 400 S, Salt Lake City - ube crepe cakes

Sweet Rolled Tacos at the Gateway and 124 State St, Orem - ube rolled ice cream

Trader Joe's also makes an Ube Mochi and Waffle mix that's pretty popular. I haven't tried it, but let me know if you do.


I found this recipe at PinoyCookingRecipes. I added white chocolate chips to the dough. They are very moist and pack an ube flavor. The two ube ingredients that you need for this dessert are ube halaya/halayang (purple yam jam) and ube flavor extract. You can find them online or at many Asian food stores. 


Ube Crinkle Cookies

1 1/2 c. flour 
1 t. baking powder
1/4 t. salt
1/2 c. butter, softened
1/2 c. granulated sugar
1/4 c. brown sugar
1 egg
1/2 c. ube jam/halaya  
1-2 t. ube flavor extract
1/3 c. white chocolate chips, optional
Powdered sugar for dusting

In a small bowl, combine flour, baking powder and salt. Set aside. 

In a large bowl, beat together butter and sugars. Add egg and beat until fully incorporated. Add ube jam/halaya and ube flavor. Beat just until combined. Gradually add the flour mixture and continue beating until fully incorporated. Mix in white chocolate chips just until combined.

Cover the bowl and refrigerate for at least 4 hours or overnight.

Preheat oven to 350°. Scoop about 1 tablespoon of dough and roll into a ball.  Coat with powdered sugar. Coat a second time to get the powdered cracks on top after baking. Place on baking sheet lined with silicone baking mat or parchment paper spacing them at least 2" apart.

Bake in preheated oven for 10-12 minutes or until nearly set. They should be soft when touched and should appear slightly under-baked. Allow to cool a minute or two on the sheets before transferring to a wire rack to cool completely.

Sunday, April 18, 2021

Chocolate Mousse Mini Muffins

This one is for the chocolate lovers! I used my favorite mini-muffin recipe, the easiest mousse recipe I know, and fresh raspberries. Of course, you could top it with cherries, strawberries, or whatever you'd like.


Chocolate Mousse Mini Muffins

3/4 c. cocoa
1 heaping t. baking powder 
3/4 c. butter, melted
1/2 c. boiling water
1 T. vanilla
1 1/4 c. sugar
2 eggs
1 1/3 c. flour
1/4 t. salt
1/2 - 1 c. mini chocolate chips 

Mousse:
1 c. heavy whipping cream
1 (4.25-oz) Milk Chocolate Symphony Bar 

Topping:
1/3 c. chocolate, melted
1/4 c. powdered sugar

Set oven to 350°F. Line or grease around 38 mini muffin cups. 

In a medium bowl, combine cocoa and baking powder; mix to combine. Add in boiling water; mix well with a wooden spoon to combine. Add in the melted butter and vanilla; mix well.

Add in the sugar, mix well with a wooden spoon. Stir in eggs and mix until combined. Mix the flour with salt. Add in the the chocolate mixture and mix well. Add mini chocolate chips and mix just until combined.

Fill each of the muffin cup almost to the top. Bake for 10-12 minutes or until muffins are just done. After a few minutes, remove from pan and let cool on cooling rack.

While the muffins are cooling, make mousse. Melt chocolate bar and set a side to cool slightly. Whip heavy whipping cream until soft peaks form. Fold in melted chocolate. 

Using pastry tamper, lightly tamp the middle of each mini muffin to create a shell. Fill each muffin with mousse either using a spoon or piping the mousse. Top each muffin with a raspberry. Drizzle melted chocolate over muffins. Sift powdered sugar on top. Refrigerate until serving.