I posted this recipe waaaay back in 2008. I didn't have a photo of it then and since I remembered to take a photo this time and probably no one looks back that far in the archives, I figure it's fine to repost the recipe. I love how tender the yogurt makes the chicken and the lemon-basil flavor from the marinade. The red pepper relish makes this sandwich special. I use rolls instead of the focaccia and romaine instead of arugula. Sometimes I use spinach. Pretty healthy dish.
Basil Grilled Chicken Sandwiches With Red Pepper Relish
1 c. plain yogurt (low-fat or non-fat)
1 lemon, juice and zest of
1 garlic clove, minced
10 basil leaves, chopped
4 boneless skinless chicken breasts
1 T. olive oil
1/2 c. finely chopped yellow onions
1 garlic clove, minced
Salt
Fresh ground black pepper
1 c. fresh red peppers, chopped
1 T. balsamic vinegar
10 basil leaves, chopped
1 c. arugula leaves
4 small loaf focaccia bread, sliced in half
Mix the yogurt, lemon juice and zest, garlic and basil together in a large mixing bowl. Add the chicken and coat it evenly with the yogurt mixture. Cover and refrigerate for at least 1 hour or overnight.
Meanwhile, prepare the red pepper relish. Heat the olive oil in a small skillet over medium heat. Add the red pepper, onion and garlic and season with salt and pepper. Cook until the vegetables soften, about 5 minutes. Add the balsamic vinegar and cook for 5 more minutes. Remove from heat, cool and stir in the basil. This can be stored in the refrigerator for up to 1 week.
For the chicken preheat the grill to high heat. Remove the chicken from the marinade and discard the marinade. Season the chicken with salt and pepper. Grill the chicken on both sides until it is cooked through, about 6 to 8 minutes per side. Let the chicken cool slightly and slice it on the bias.
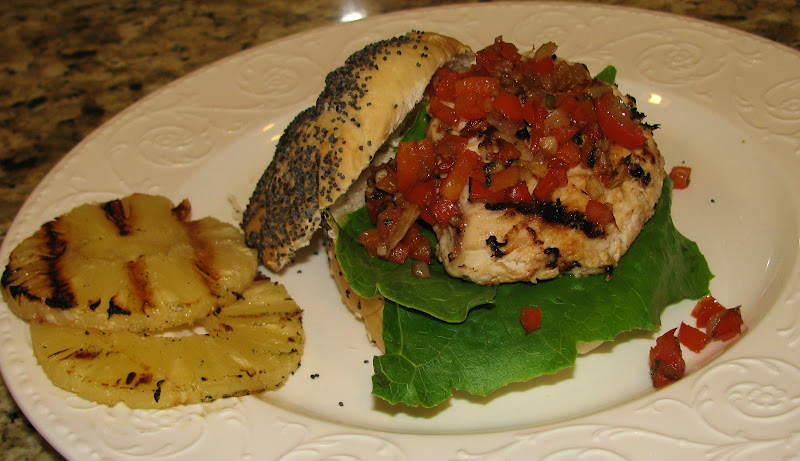
For the sandwiches spread 4 halves of the focaccia with some of the red pepper relish, then top with sliced chicken and arugula. Finish the sandwiches with a dollop of relish and the other half of the focaccia.
Tuesday, August 7, 2012
Thursday, August 2, 2012
Blueberry Cinnamon Roll Cake
What is better than a cinnamon roll cake? Try a cinnamon roll cake with berries! I found this recipe at Eat Cake for Dinner and couldn't wait to try it. The only thing I would do differently is double the amount of topping and swirl half the topping in and then top the cake with the other half to get more cinnamon in there. I was in a hurry and had to take the cake out after 33 minutes, even though it probaly could have used a few more minutes of baking, but it was moist and had a great flavor. I love all berries so I might try it with a different berry next time.
Blueberry Sauce
Blueberry Cinnamon Roll Cake
Blueberry Sauce
1 pt. blueberries
1/4 c. water
1 T. sugar
Juice of 1/2 a lemon
1 t. vanilla extract
Cake
3 c. all-purpose flour
1/4 t. salt
1 c. sugar
4 t. baking powder
1 1/2 c. milk
2 eggs
2 t. vanilla extract
1/2 t. orange zest, opt.
1/2 c. butter, melted
Topping
1/2 c. butter
1 c. brown sugar
2 T. flour
1 T. cinnamon
Glaze
2 c. powdered sugar
2 - 3 T. milk (more if needed)
1 t. vanilla extract
To make the blueberry sauce: Add the blueberries, water,
sugar and lemon juice to a saucepan. Cook over medium heat until thickened,
mashing the blueberries as you go. Once thickened, remove from heat and stir in
the vanilla. Set aside to cool.
To make the cake: Preheat oven to 350°. Grease a 9x13-inch pan.
Combine the flour, salt, sugar and baking powder. In a separate dish combine
the milk, eggs, vanilla, orange zest and melted butter. Add wet ingredients to
dry and stir until combined. Pour into a greased pan. Dollop blueberry sauce over cake batter and
swirl using a butter knife. (OR pour half batter into pan and then pour blueberry sauce over whole cake. Top with remaining batter and topping.)
For the topping: Combine brown sugar, flour and
cinnamon. Cut in the butter until it looks like wet sand. Sprinkle evenly over
the cake. Bake for 30-33 minutes. Let cake cool for 20-30 minutes.
To make the
glaze: Whisk together all ingredients until smooth, adding only enough milk
until it reaches desired consistency. Pour over slightly cooled cake. Let cake
sit for 1 1/2 - 2 hours before cutting and serving. Don't rush this part or you
might end up with a completely sunken cake.
Subscribe to:
Comments (Atom)
-
What's your favorite kind of M&M's? Mine is definitely Peanut M&M's...not peanut butter--ewww! Emily at Visions of Sugar...
-
I made this meal for the first time tonight and it was a hit at our house. I found it on Good Lovin' On A Plate . It was juicy and full...
-
Since this Sunday will be fast Sunday at church, I have been thinking about fasting in my life. I like food. (Can you tell by even a quick s...